Showing posts with label Our Daily Bread Designs. Show all posts

Wednesday, October 15, 2014

Silent Night Card

Hello Delightful Friends and Family!

Here is a sample of one of the cards I made for a class I have coming up in November, it's perfect for two challenges I saw online today.
Word Art Wednesday #154 - Anything Goes using an Our Daily Bread Designs stamp
Merry Monday Christmas Challenge Blog  #130 - Silent Night

I've used silver embossing powder for the sentiment and on the snowflake (Spellbinder die). I've embossed the snowflake multiple times to add dimension and embellished the center with an acrylic white snowflake and a sequin.  I've added a red ribbon for an added bonus of an ornament.  I've affixed the snowflake with a repositionable adhesive Zot.  The stamp from ODBD is from a set called Blessed Christmas.


The embossing folder is from Sizzix  (Snowflake #6).  Neenah bright white card stock and Bazzill red card stock are the papers I've used.

Thanks so much for looking!  

Oh, taste and see that the LORD is good;
Blessed is the man who trusts in Him!  Psalms 34:8


Photobucket

Saturday, September 27, 2014

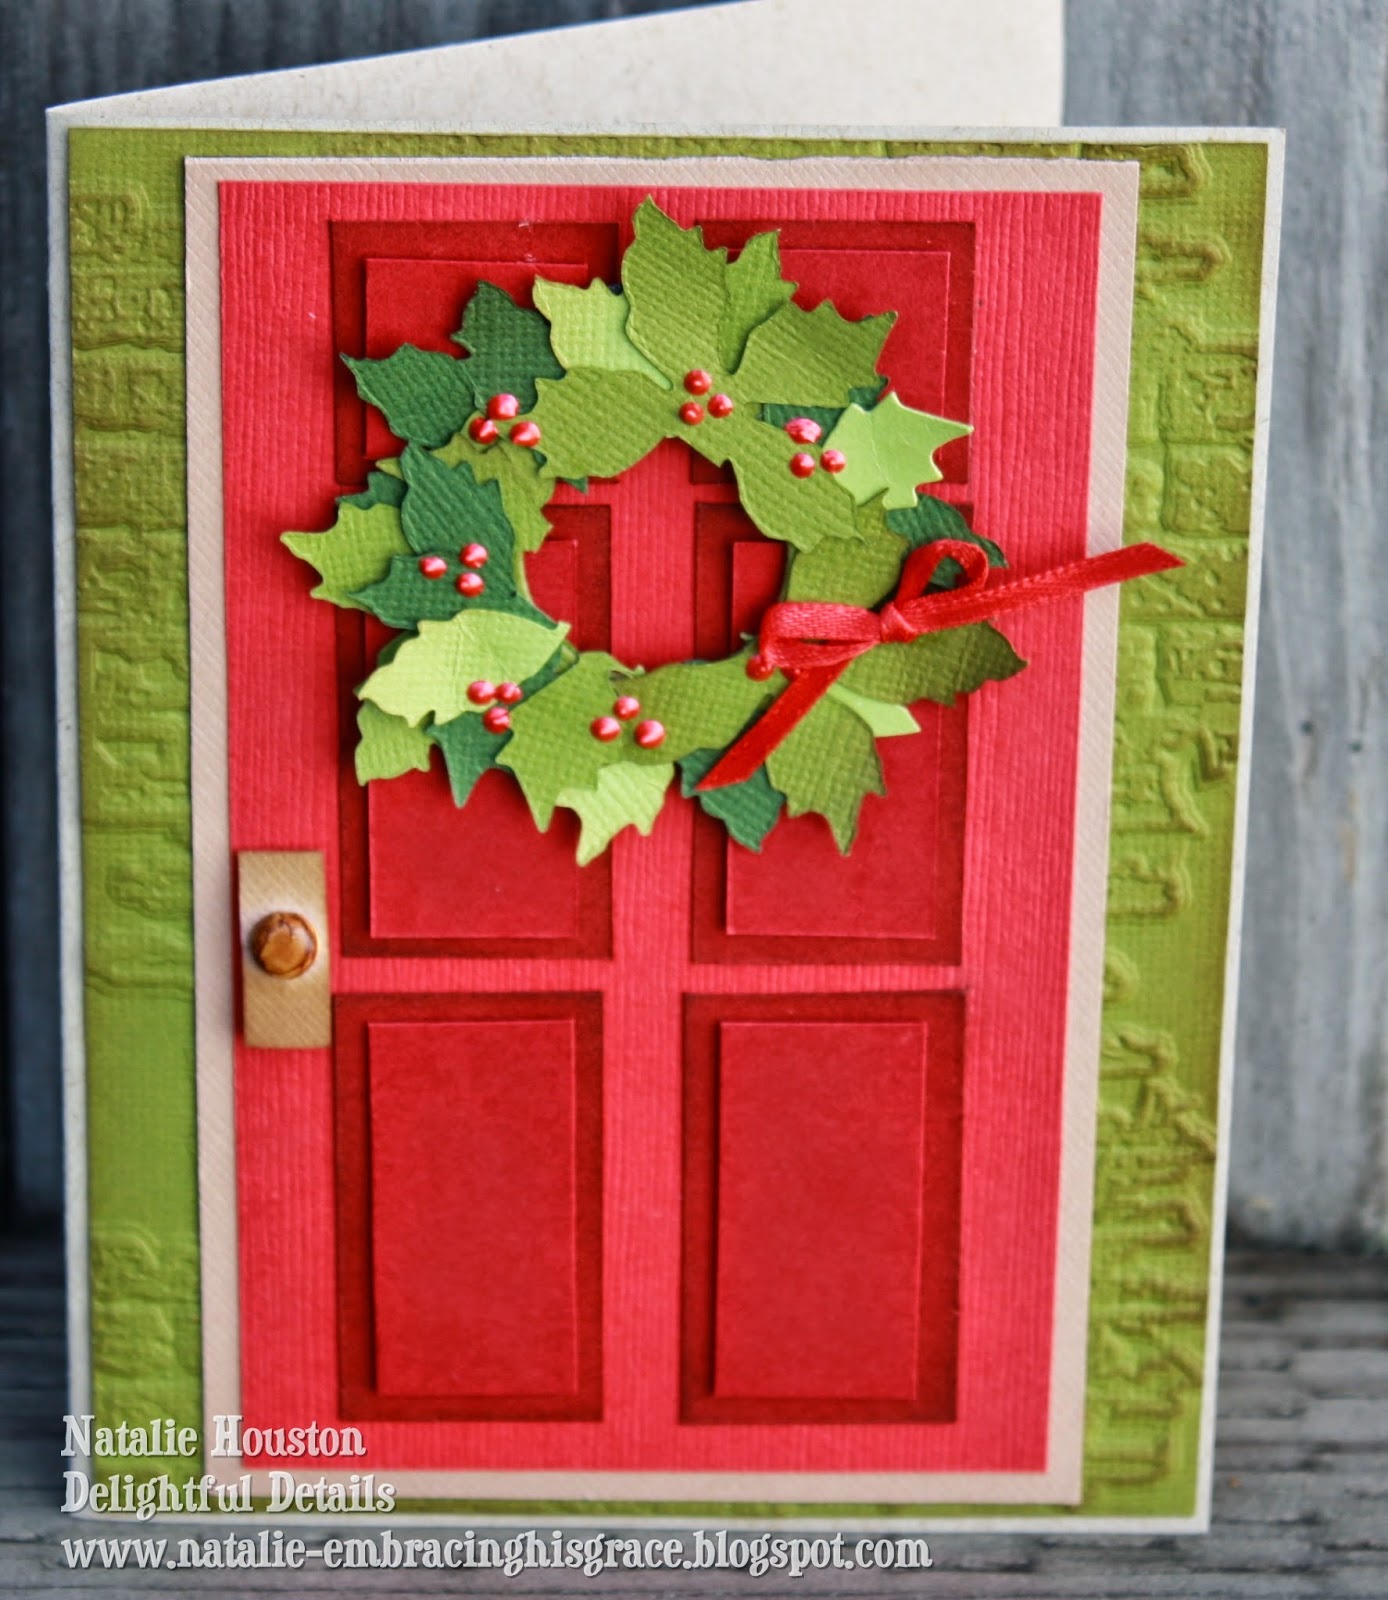
Festive Friday #41 Christmas Door

Hey there Delightful Friends and Family!
Ok, last card I posted was quick and easy and this one not so much!! (ha!) However, once it was designed and figured out it wasn't quite as difficult (I made a second one with a fall theme that was super fun and I'll share it in another post later on).  I saw this inspiration picture at Festive Friday and knew this would be perfect for the challenge! I was inspired by the wreath and door.


The wreath is a Sizzix Movers and Shakers Die which I cut multiple times with light, med, dark green card stock and then added Dimensional Pearls in Red Pepper.  My base is Desert Storm Neenah card stock.  I've added the medium green card stock layer after running it through the Cuttlebug in a Sizzix Brick embossing folder and then with a Ranger blending tool I used Vintage Photo Distress Ink to add a bit of ink to the green.  

 
Inside of card:  Our Daily Bread Stamp - Christmas Door

Thanks for letting me share and this is one of the cards that will be featured in my class at Scrapper's Edge in November!  

But the salvation of the righteous is from the LORD; He is their strength in the time of trouble. And the LORD shall help them; He shall deliver them from the wicked, and save them, because they trust in Him.  Psalm 37:39-40


Photobucket

Monday, December 9, 2013

Christmas Tags Day 5

Hello Delightful Friends and Family! '
 If you are returning for Day 5 of my Christmas tags, 
THANK YOU!  

Here are some more of my favorite tags.
I've entered them in the Try Stampin' on Tuesday - Tag-Stavaganza
and
Totally PaperCrafts Challenge Blog #196 (Anything Christmassy but not a card)

 Aren't these cute?!
All the trees are from Taylored Expressions (Woodland Winter set and matching dies)
Left tag sentiment is from Lawn Fawn (Peace, Joy, Love set)  I've added Liquid Pearls to embellish.
Right tag: sentiment stamp is from Our Daily Bread Designs and the Stitch lines are from the Lawn Fawn set; the Holly is from the Taylored Expressions set mentioned above.


Sentiments are stamps from Our Daily Bread Designs (Luke 2:11 and Christmas Verses)
EK Success Corner rounder on left tag; Oval scallop is a Spellbinders Nestabilities die. The Holly berry stamp is that notorious unknown stamp set.

 Close up of the details
Tag on the left:  background was first made with the Distress ink pads & stains, Dylusions ink sprays, a mini mister filled with water and a craft sheet, dried with a heat gun and then embossed with a Sizzix (Alterations) Holly folder; the seam binding was dyed using the matching inks from the background colors and then I pleated it (here is a TUTORIAL for the pleated ribbon) and adhered it to the designer paper (Carta Bella - "Merry Notes" So this is Christmas Collection) Added a bow and a button (Queen & Co) to finish it off.
Tag on the right: background laid down first, then stenciled (Alterations Harlequin design) over the background.  Then the layers begin with the Carta Bella Paper, Holly leaves stamped and fussy cut, spritzed with Tattered Angels Glimmer Mist.  Buttons (Queen and Co.) added for the berries.

Thanks again for visiting and hope you might glean a little crafty inspiration!


Be glad in the LORD and rejoice, you righteous;
 And shout for joy,
 all you upright in heart!  Psalm 32:11 


Photobucket

Friday, December 6, 2013

Christmas Tags Day 2

Hello Delight friends and family!  Has this week flown by or what?!!
Just a quick post to share 3 more tags I've made for the Ladies Ministry Christmas Party. I try to make a little something for those that attend as a thank you for their continued prayer support for our church.
I am so grateful for their prayer support!!  It's not always easy being a pastor's wife but they sure make it a joy when I know they are praying for me!

I've entered this tag in the Try Stampin' on Tuesday - Tag-Stravaganza 

This stamp set is from Our Daily Bread Designs (Luke 2:11).  I stamped the poinsettia twice and popped it up after coloring it with Copics, then added Glossy Accents to the center of the flower.  Distress Inks Fired Brick and Vintage Photo were used around the tag, Memento Ink Northern Pine was used to stamp the Scripture verse.  The tag was also spritzed with some Tattered Angels Glimmer Mist to add a bit of shimmer but the photo doesn't show it, it really is a pretty finish to the simple tag.

The first tag with the large holly berries was stamped with Memento Northern Pine and Liquid Pearls were added to the little berries on the Merry Christmas (I've torn the edges and then distressed them with ink).  Sorry, can't remember the stamp set but it is a coordinating set.  The large berries were stamped with Distress Ink - Fired Brick, then Glossy Accents was added for dimension.  The second tag was covered with Designer Paper (from my Christmas stash) and the Jar and Topper is a stamp and Die set from Taylored Expressions, I paper pieced the mini tag and hand wrote "To" and "From".  The pleated ribbon is a technique I used and then I made a bow using my Bow Easy and positioned it on a button.  There are a few layers under the ribbon but  the pic just doesn't show the details very well.  The Holly Berries stamp in the jar are also from Taylored Expressions, the Merry Christmas stamp is a wood mounted stamp I've had for a few years. Both tags were embellished with Liquid Pearls.   (In my first Christmas Tag post, I shared the inks and stains I've used for the backgrounds of most of the tags and the ribbon at the top of each tag is seam binding that I've dyed)

That's it for me!  Thanks for visiting.

For the LORD God is a sun and shield; the LORD will give grace and glory.  No good thing will He withhold from those who walk uprightly.  
Psalm 84:11

Photobucket

Friday, December 28, 2012

Hope You Had a Merry Little Christmas!

Hello and a belated Merry Christmas and a Happy New Year to all my delightful friends and family!! It has been a very busy time for just about everyone I know and so my time here has been very limited.  This post will be short on words but filled with the special cards I made for my co-workers. 
 
Hope you enjoy them as much as I did in making and giving them!  I'll share some of the ingredients next to each card. I did get a new laptop for Christmas from my dear hubby (which I LOVE!) unfortunately I'm not familiar with Windows 8! Yikes!!  So my arrangement may not be how I really would like this post to look.
 
Card#1   This is CASE'd from the DT at Taylored Expressions.    Stamps: Taylored Expressions(Wheelie Great and Woodland Winter sets); Designer Paper: WeR Memory Keeper (Winter Frost); Card Stock: Bazzill and Neenah; Colored with Copic Markers; Dies: Spellbinders Nestabilities Circle and Lacey Circle; My Favorite Things Die-Namics Fishtail Flags; Tiny Twinklettes (TE) and Glossy Accents.  Ink: Memento Tuxedo Black and Distress Inks for inking edges.
 
Card #2 CAS - I saw a card that was similar on Pinterest which I've CASE'd, the original is pinned on my Pinterest Cards and Tags site. The stamp is from Taylored Expressions (Christmas Blessing Set) and the dies are Spellbinder Nestie Hexagon and 2012 Snowflake Pendant. Designer Paper: Memory Box and Card Stock: Neenah and Bazzill; Ink: Russet Archival Ink; Stickles to accent the snowflake.
 
Card #3 Stamp: Unity Stamp Company and I've colored with Copic Markers and accented with Liquid Pearls and Glossy Accents.  Designer Paper: Memory Box; Card Stock: Bazzill and Neenah.  Ink: Memento Tuxedo Black and Distress Ink to blend.  Die:  Spellbinders Nestie Card Creator, A2 Matting Basics B.
 
Card #4: Stamp: Stampers Anonymous (wood mounted K5-1878);Colored with Copic Markers and accented with a Taylored Expressions Stamp (Woodland Winter and Wreath of Joy); Die: Spellbinder Nestie Scallop Circle and My Favorite Things Die-Namics Fishtail STAX; Ink: Memento Tuxedo Black and Archival Crimson; Adhesive Pearls (stash); Designer Paper from a Taylored Expressions Key Ingredient Kit.Card Stock: Bazzill and Neenah.
Card#5 Stamp from Stampin' Up! (Evergreen set)colored with Copic Markers, sentiment:Hero Arts (wood mount: Believe); Designer Paper: Echo Park (Winter Wishes collection); Inks:Memento Tuxedo Black and numerous Distress inks for blending the background. Dies: Spellbinder Nestabilities Wonky Reverse Rectangle and A2 Matting Basics B; Taylored Expressions Mini Label die set and My Favorite Things Die-Namics Fishtale STAX.; Tiny Twinklettes and Tattered Angels Glimmer Mist and buttons and ribbon from my stash to accent.  
Card #6 Stamp from Our Daily Bread Designs(Luke 2:11 set); Ink: Memento, Tuxedo Black; Designer Paper:scraps from my collection of Christmas papers; Card Stock: Neenah Bright White; Adhesive pearls (from my stash).  Spellbinder Shapeabilities Nested Pine Trees Die.  I CASE'd this card from this year's CARD magazine (Dec 2012)
 
 
Well, thanks so much for making to the end of this LOOONG post! 
 Let me know which is your favorite. I'd love the feedback.  Have a safe and blessed New Year!
 
The wisdom that comes from heaven is first of all pure.  It is also peace loving, gentle at all times, and willing to yield to others.  It is full of mercy and good deeds. It shows no partiality and is always sincere.  James 3:17
 
 
Photobucket

Wednesday, April 18, 2012

Rusted Enamel Tag technique - Word Art Wednesday #24

 Hello Delightful friends and family,
I've been having fun experimenting with different techniques (while watching the SF Giants play on TV!) and I love the look of this one called Rusted Enamel (Tim Holtz technique).  It's a cool technique and pretty easy to do and I love this color combo.  The only thing is I think my Stazon Ink pad is needing to be refilled so the stamped images are not as pronounced as I would have liked. I've been using tags (this particular one is from Ranger, #8 size : 6-1/2" x 3-1/8" Manila colored) which is perfect for tryout the distress and mixed media techniques.  I want to eventually use a canvas but I'd like to play around on a smaller less expensive medium first.


Here are the steps to create the background on the tag before stamping.
You'll need 2 Ranger Distress Inks, I've used Broken China and Frayed Burlap and clear embossing powder (I've used Ranger Clear Embossing Powder)  for this tag.  You will want to use a Non Stick Craft Sheet (Ranger) on your craft table surface.

Step 1: Cover the tag in the Broken China color using the stamp pad itself.
Step 2: Immediately cover the tag with embossing powder and then flick the back of the tag to remove the excess. 
Step 2: Heat emboss the tag with your heat gun.  Be careful the embossing powder melts and is hot to touch. Let it cool
Step 3:  Using a blending tool go over the entire tag with the brown ink
Step 4: Wipe off excess ink with cloth or paper towel.
Step 5: Stamp your design

This close up really shows the texture of the embossed technique and the the brown color in the grooves.


Same technique using Distress Ink, Peeled Paint and I tried using Aged Mahogany Distress Stain (instead of the stamp pad)and it worked just fine. I put a little puddle of the stain on my craft sheet and worked it onto the tag using a Blending Tool (Ranger). 

Other supplies used:  Stamps from Taylored Expressions, Ranger Dylusions and Our Daily Bread; Stazon jet black ink pad; Black Sharpie pen; Claudine Helmuth Studio Paint (color: Dab of Yellow) Distress Ink, Pine Needles (shading of leaves on tree and trunk) and Q-tips.

I've entered this tag at the Word Art Wednesday Challenge #24
I learned this technique at our local scrapbook store, Scrapper's Edge a couple of years ago at the Distress to Impress Class #1.

"In all your ways acknowledge Him, and He shall direct your path."  Proverbs 3:6

Thanks for visiting!
Photobucket

Saturday, February 11, 2012

Praying For You - CPS Day 11 Sketch 170

Hello Delightful Friends and Family,
I needed a sympathy card (a ministry friend's wife went to be with the Lord this week) for a memorial service and gathering we are going today.  I've needed too many of these cards lately.  Please lift up our friend Jim whose wife passed quite suddenly and unexpectedly on the way to the city to have some medical tests done.  Two memorial services today... it may be a tough day but please pray that we will be able to share the love and comfort that comes from knowing Jesus.

Today I'm sharing Day 11 at the Card Positioning Systems Anniversary challenges. Jennie Harper chose this sketch and had a cute Valentine card to share.

CPS #170


I tried to keep this somewhat masculine (even though there is a bit of pink) with the sponging and the water color technique with more earthtones.  I sponged Broken China Distress Ink around the Scripture which matches the paper nicely although it doesn't really show that in this picture.
Ingredients:  Stamps: Our Daily Bread Designs (Scripture collection 3) and Taylored Expressions (sentiment; Care & Comfort); Designer paper: KaiserCraft, Hummingbird collection; Card stock: Bazzill and Watercolor Paper. Distress stains: Tea dye and Tumbled glass; Distress Inks: Broken China and Vintage Photo; Memento Tuxedo Black; Fiskars Upper Crest border punch; Spellbinder Nesties Labels 22; Cuttlebug

Enjoy your day and God bless.

Be still and know that I am God.  Psalm 46:10

Photobucket

Friday, December 16, 2011

SNTOBDB48 a Christmas challenge

Hello Delightful Friends and Family!
I can't believe that December is half over and it's been almost a month since I've posted anything here on the blog.  That just shows how extra busy I've been.  I have a couple of things to share today for a Christmas challenge at Our Daily Bread Designs (SNTODBD49).  One is a card I just finished tonight and the other is a mini canvas that I made (actually I made 30!) for our Ladies Ministry Christmas party.  Both items I used ODBD Christmas Door stamp set.
I've colored the door scene with Copics and the ribbon is from my "stash".

I used a green and pink Spica pen for the glittery look.  The picture isn't showing the details but the bow is a very pretty and sparkly.  The garland also has a touch of bling as well.
Inside of the card.  The designer paper is Making Memories and the card stock is Bazzill and Neenah. Memento Rich Cocoa ink and Spellbinders Nestabilities Die were also used.

I really should do a quick pictorial tutorial for these because they are really fun.  These canvases come with the easel and each canvas is 2.5 x 2.5.
The verse is from Psalm126:3 (ODBD Christmas Door) the other stamps are from Taylored Expressions.  I've used Claudine Hellmuth Studio Paint, Stazon Ink, Mod Podge, white tissue and Ranger Liquid Pearls, Tiny Twinklettes, American Crafts ribbon and Snowflakes (stash)


Thanks so much for looking!  I plan on another post very soon of the kiddos and pictures that you WON'T see on their Christmas card this year!  Have a blessed day and truly "The LORD has done great things for us, and we are filled with JOY!!
Photobucket

Thursday, November 17, 2011

Go Metallic! - ODBDSLC84

Hello Delightful friends and family,
Just a quick post:
I'm participating in the challenge to Go Metallic!! at Our Daily Bread Design.  And those two words inspired this card.   I kept it pretty simple in design, I hope you like it.


The stamp set I've used is called Christmas Verses (ODBD) which I've stamped with Versamark and embossed with Ranger Gold Embossing Powder.  The beautiful gold and cream designer paper is from K&Company (a couple of seasons old, I'm not sure the name of the collection - it came in a 12x12 pad) the holly leaves and berries are a gold foil embossed into the paper. The card stock is from Bazzill and the ribbon is American Crafts.  I've used the Spellbinders Nestabilities Labels 22.  I've embellished with Tiny Twinkles, gold (Taylored Expressions).  The EK Success border punch is called Scallop Diamond, the Corner Punch is also from EK Success.  I've used the Cuttlebug to cut and dry emboss.

Thanks for looking and commenting, may you have a blessed day!


Photobucket

Friday, November 11, 2011

Sketch Challenge at ODBD

Hello Delightful friends and family!
'Tis the season... This is the card I've made for the sketch challenge at Our Daily Bread Designs (ODBDSLC83).  A random drawing determines the winner of a $15 gift certificate to be used at the ODBD store and I'm just going to confess this: there is a stamp set I'd really like to get for a project I'm doing for our Ladies Ministry Christmas Party.  Do I NEED it? Probably not a need but...  it has a Scripture verse with it that would be ideal for what I'm doing.  So I'd best get this posted so I'll at least have the opportunity to win!
Ingredients:  Stamp: Our Daily Bread Designs, Luke 2:11 set; Designer Paper: Girls Paperie;  Card Stock: Bazzill; Ribbon: American Crafts; Inks: Archival: Olive; Distress Ink, Shabby Shutters; Memento: Tuxedo Black; Adhesive Pearls: Kaiser Craft; Glimer Glam (Organic Garden), Tattered Angels;  Image colored with Copics: R37, R46;YG95, G97.  Spellbinders Nestabilies: Labels Twenty-Two, Cuttlebug.

Thank you for looking and may you have a real blessed weekend!
Photobucket

Thursday, October 13, 2011

Shining Light Challenge #79

 Hi Delightful friends and family!   I've made a card to encourage (always good to have a few of those around!).  This also meets the requirements for the challenge to make your own embellishments at ODBD (ODBDSLC79).  The butterfly is diecut from grungeboard and I used Distress Inks (Broken China, Aged Mahogany) to color it,  then stamped it (Inkadinkadoo - the tiny swirl on the butterfly), and then applied (with a paint brush) Tattered Angels Glimmer Glam (Mermaid) to give it a shimmery look.  After it was dried I added Adirondack Dimensional Pearls (Espresso & Terra Cotta) to accent. I've used the adhesive pearls from Hero Arts Gems and Pearls. 
These pics unfortunately turned out more green than blue.


The inside was completed with a stamp from Our Daily Bread Designs Scripture Collection 3  I used another piece of the designer paper from BoBunny Forever Fall and stamped with Memento Rich Cocoa ink and framed it out with Bazzill card stock.

But now, O LORD, You are our Father; We are the clay, and You our potter; And all we are the work of Your hand.  Isaiah 64:8


Thanks for looking and have a blessed day!
Photobucket

Thursday, September 29, 2011

Stamping in Time with Our Daily Bread Designs!

The challenge week is to distress and so boy did I distress!! Welcome to Delightful Details! 

 Today I'm playing in a challenge from Our Daily Bread Designs called Stamping in Time.  This week the challenge is to distress.  The distressing can be by inking up edges, using a distressing tool, crumble up paper, you name it, and so I did it!
(SNTODBD44)
I cut my base from Bazzill (Aqua) card stock and set it aside (A2 size).  Next I cut a piece of designer paper, (Dream Street Papers - Father Knows Best - Arties Tie) crumbled it up and then using my fingernail I distressed around the edges of the paper.  Then I used a blending tool (Ranger) and inked all around the paper with Ranger Distress Ink (Vintage photo).  Then I adhered it to the base.

This middle piece is actually Sticky Back Canvas (Claudine Hellmuth) which I've prepped with Gesso (this was done ahead of time) and then I used  the following Claudine Hellmuth Studio acrylic paints: altered orange, classic teal, sable brown, traditional tan (base), dab of yellow, yellow pastel and dab of red.  I wasn't sure what I was doing to be perfectly honest with you!  But after the paint was on and smeared and combed and splattered with a toothbrush, then I stamped over the wet paint with one of the stamps from the Artful Flight (Tim Holtz Stamper's Anonymous, the flourishy looking stamp) It just leaves a subtle design.  I used a heat gun to dry, then I stamped the Our Daily Bread Designs Scripture Collection 4 verse from Philippians 4:6 with Memento Tuxudo Black ink.  In retrospect, I wish that I had lightened up the center so the verse would have stood out more.  (next time!)
Here are the accessories I've used they include all buttons from Taylored Expressions Key Ingredient Kit (Sept); The Darice Hemp twine (curlies) was twisted around a paint brush and I added Studio Multi-medium (matte) to stiffen and then cut to size and adhered with Glossy Accents.  The little butterfly stamp (Taylored Expressions - Summer Wreath) was stamped on the left over Sticky Back Canvas and then fussy cut (2) and adhered to the card.  The flowers I've used come from Making Memories and BoBunny. The aqua colored flower I crumbled then used Distress Ink (Vintage Photo) to distress and age it.  Whew, I think that about covers it! 

I couldn't help but think about the word distress and that doesn't sound like something we like to go through in our daily walk but in reality we do go through things that are quite distressing so I think the verse on the card really says it all!  It's a really good verse to memorize and take to heart.  The two verses before it in the Bible says "Rejoice in the Lord always. Again I say, rejoice!  Let your gentleness be known to all men, the Lord is at hand" (verses 4&5)  Have a blessed day and rejoice!
Thanks for visiting and have an excellent day!
Photobucket

Monday, April 25, 2011

Our Daily Bread Design's Shine the Light challenge #58

Hello Delightful friends and family!


It's been ages since I've played along in an Our Daily Bread Designs challenge. But I thought I'd give it a go, the Design Team over there is fabulous and so I'm a little intimidated by all the talent over there but I couldn't pass up this fun sketch! The ladies that I'm acquainted with are such sweeties, so when I say I'm a bit intimidated that's totally my insecurities and not a reflection on them whatsoever! It is absolutely a wonderful blessing to have them as a partnering company at Christian Paper Crafts!!


I'm still in the "Mother's Day" mode when making cards so that's my theme with this card as well. Although the inside (so far) is blank, so it could be a card of encouragment for a friend.


(ODBDSLC#58) The stamp is from a set called Scripture Collection 4 (Our Daily Bread Designs) and I've used the Spellbinders Nestabilites Wonky Reverse Rectangles and I've sponged first with Distress Ink, Antique Linen and then used the Worn Lipstick (keeping the die in place), then removing the die, I've inked the edges with the Worn Lipstick. The verse was stamped with Palette, black ink. Before adhering everything together I machine stitched around the three main pieces (the matted designer paper).

I thought the gingham checked ribbon looked so cute with the floral paper by The Girl's Paperie (Kitch line). The ribbon and flower are from the Taylored Expressions Key Ingredient kit.


There are lots of layers to this card. The base is Choice Buttercream, next is Petunia (cut 1/8" smaller), then the designer paper 1/8" smaller than the pink Petunia. All of the card stock is Bazzill brand. The Sunbean (yellow c/s) is used to mat the smaller rectangles and is also the paper used to punch out the Photo Corner Scallop by EK Success. All of the Designer paper has been inked around the edges with Distress Ink, Worn Lipstick, also the photo corner has been inked although the picture doesn't show it. The verse has been popped up using dimensionals.


Thanks for looking and God bless you this week!! Looking forward to your delightful comments!!


Photobucket